Remington Models
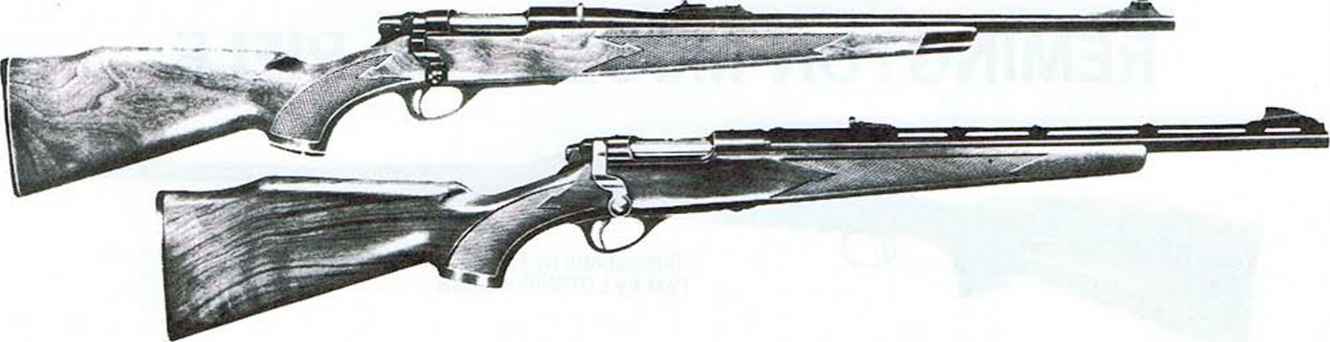
In 1964, Remington introduced their Model 600 bolt-action carbine, a handy lightweight center-fire arm well adapted for carrying in a saddle scabbard. Its simple strong action is characterized by dual front locking lugs, stock-hugging bolt handle, box magazine, and a thumb-operated safety. Other outstanding features are an ISV2" barrel fitted with a ventilated rib and open sights, and a walnut stock with long fore-end and Monte Carlo comb. Weight unloaded is approximately six lbs. It was offered in .308 Winchester, .35 Remington, .222 Remington. 6 mm. Remington, and .243 Winchester chamberings, which afforded an excellent selection for both big game and varmint hunters.
A version of this carbine designated Model 600 Magnum was introduced in 1965. Chambered for the .350 Remington Magnum cartridge, this arm is sufficiently powerful for taking the largest North American big game. It features a laminated walnut and beech stock with Du Pont RK-W finish, rubber recoil pad, leather sling strap, and quick-detachable swivels. An upward extension of the barrel bracket provides support for a telescope sight mount. In 1966, this model was made available in an additional chambering, the 6.5 mm. Remington Magnum.
Remington brought out the Model 660 and Model 660 Magnum carbines in 1968 to replace the Models 600 and 600 Magnum. These new models are mechanically the same as the carbines they replaced, and are offered in the same calibers except that the .35 Remington chambering was dropped. New features of the 660 models are a long bolt sleeve to help keep out dirt and water, 20" barrel without rib, improved open sights, and a black nylon fore-end tip and grip cap set off by white-line spacers. RK-W stock finish is standard on both regular and Magnum versions as is an upward extension on the barrel bracket to help support a telescope sight mount.
Takedown instructions for the Model 660 also serve for the Model 600.
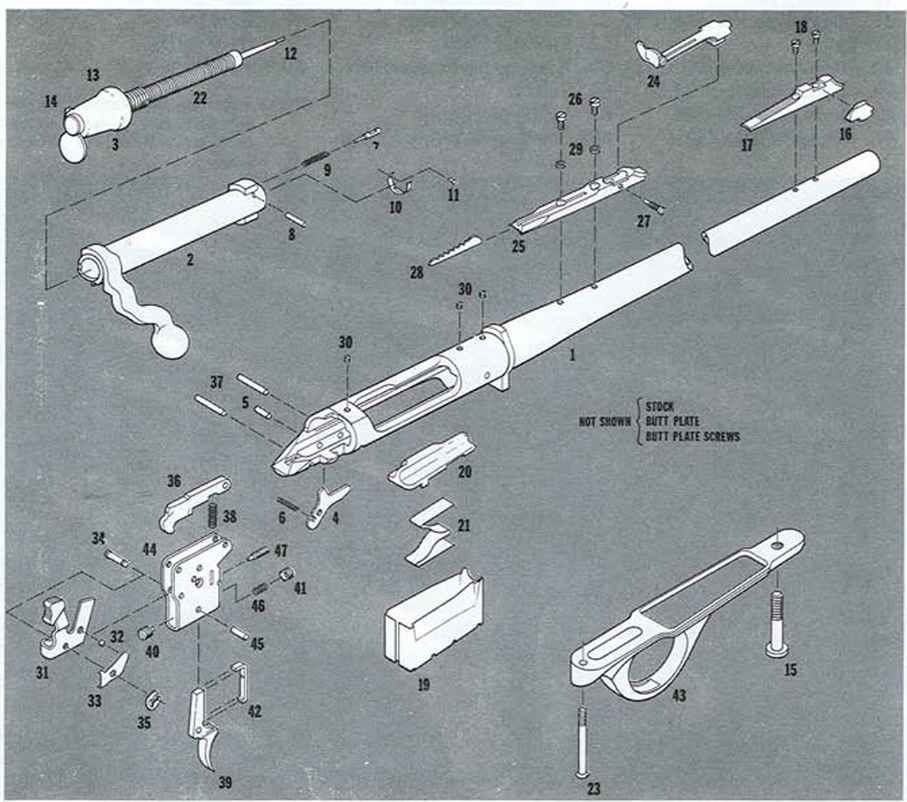
1. Barrel and receiver assembly
2. Bolt
3. Bolt plug
4. Bolt stop
5. Bolt stop pin
7. Ejector
8. Ejector pin
9. Ejector spring
10. Extractor
11. Extractor rivet
12. Firing pin
14. Firing pin head
15. Front guard screw
16. Front sight
17. Front sight ramp
18. Front sight ramp screw (2)
19. Magazine
20. Magazine follower
21. Magazine spring
22. Mainspring
23. Rear guard screw
24. Rear sight assembly
25. Rear sight base
26. Rear sight base screw (2)
27. Rear sight screw
28. Rear sight step
29. Rear sight washer (2)
30. Receiver plug screw (5)
31. Safety
32. Safety detent ball
33. Safety detent spring
34. Safety pivot pin
35. Safety snap washer
36. Sear safety cam
38. Sear spring
39. Trigger
40. Trigger adjusting screw
41. Trigger adjusting screw, front
42. Trigger connector
43. Trigger guard
44. Trigger housing
45. Trigger pin
46. Trigger spring
47. Trigger stop screw
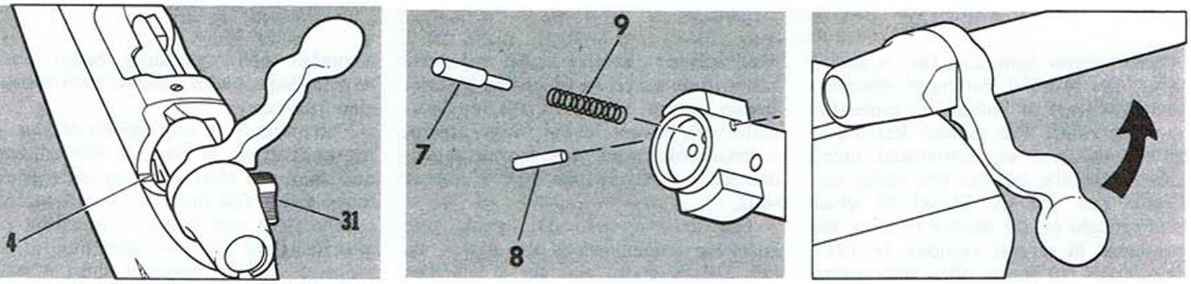
ITo disassemble, unlock bolt by pushing safety (31) forward to FIRE position. Raise bolt handle and pull bolt rearward. Check to see that chamber and magazine are unloaded. Using a small, flat key or screwdriver, press down on front of bolt stop (4) located in left rear of bolt channel in receiver. Withdraw bolt from receiver.
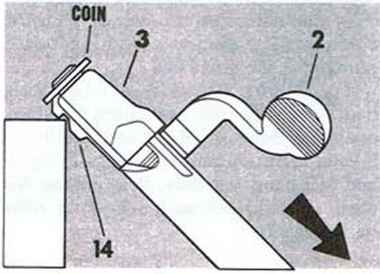
2 Clamp firing pin head (14) securely in vise jaws and move bolt (2) until coin or washer can be inserted into small slot in rear of firing pin head, (Model 660) or between firing pin head and bolt plug (3) in Model 600. Bolt can also be moved after hooking notch on bottom of firing pin head over a sharp corner. Unscrew and remove firing pin assembly (13) from bolt. Coin or washer must remain in slot or between firing pin head and bolt plug at all times when firing pin assembly is removed from bolt. Should coin become dislodged, difficulty will be experienced in replacing firing pin assembly. Further take down of firing pin assembly is not recommended and should be attempted only if necessary by a qualified gunsmith.
3 Drive out ejector pin (8) and remove ejector (7) and ejector spring (9) from bolt head. Do not attempt removal of extractor. Unscrew front and rear guard screws (15) & (23) and remove trigger guard (43) and stock. Action of Magnum model may require more effort to disassemble due to custom bedding in stock. Removal of stock and trigger guard is necessary only for replacement of parts or adjustment of trigger mechanism.
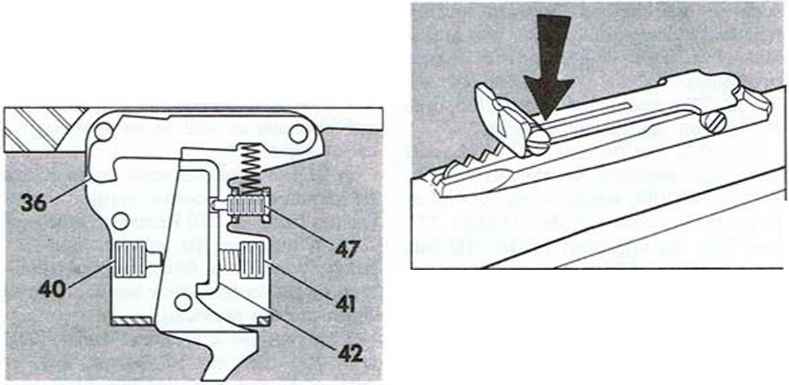
4 Trigger pull may be adjusted to desired weight by turning front trigger adjusting screw (41) clockwise to make pull heavier or counter-clockwise for a lighter pull. Do not adjust rear trigger adjusting screw (40). It is properly adjusted and sealed at the factory to provide correct engagement of trigger connector (42) and sear safety cam (36). To reduce trigger travel, place bolt in receiver and cock action. Turn trigger stop screw (47) clockwise until firing pin will not fall when trigger is pulled. Re-cock action and back off stop screw until firing pin falls. Adjusting in this manner will give minimum trigger overtravel.
5 Reassemble rifle in reverse. Firing pin must be cocked before replacing bolt in rifle. If firing pin becomes uncocked, firing pin head will be deep inside bolt plug. To cock firing pin, clamp firing pin head in vise jaws and raise bolt handle until firing pin head snaps into small cocking notch on rear of bolt.
6 To adjust windage, turn windage screw (arrow). Turn screw clockwise to move rear sight eyepiece to left, and counter-clockwise to move eyepiece to right. ■

Hunting Mastery Selected Tips
Deer hunting is an interesting thing that reminds you of those golden old ages of 19th centuries, where a handsome hunk well equipped with all hunting material rides on horse searching for his target animal either for the purpose of displaying his masculine powers or for enticing and wooing his lady love.
Related Posts
Responses
-
bellisima5 years ago
- Reply
